

CNC Workholding for Beginners: How to Keep Your Part From Moving
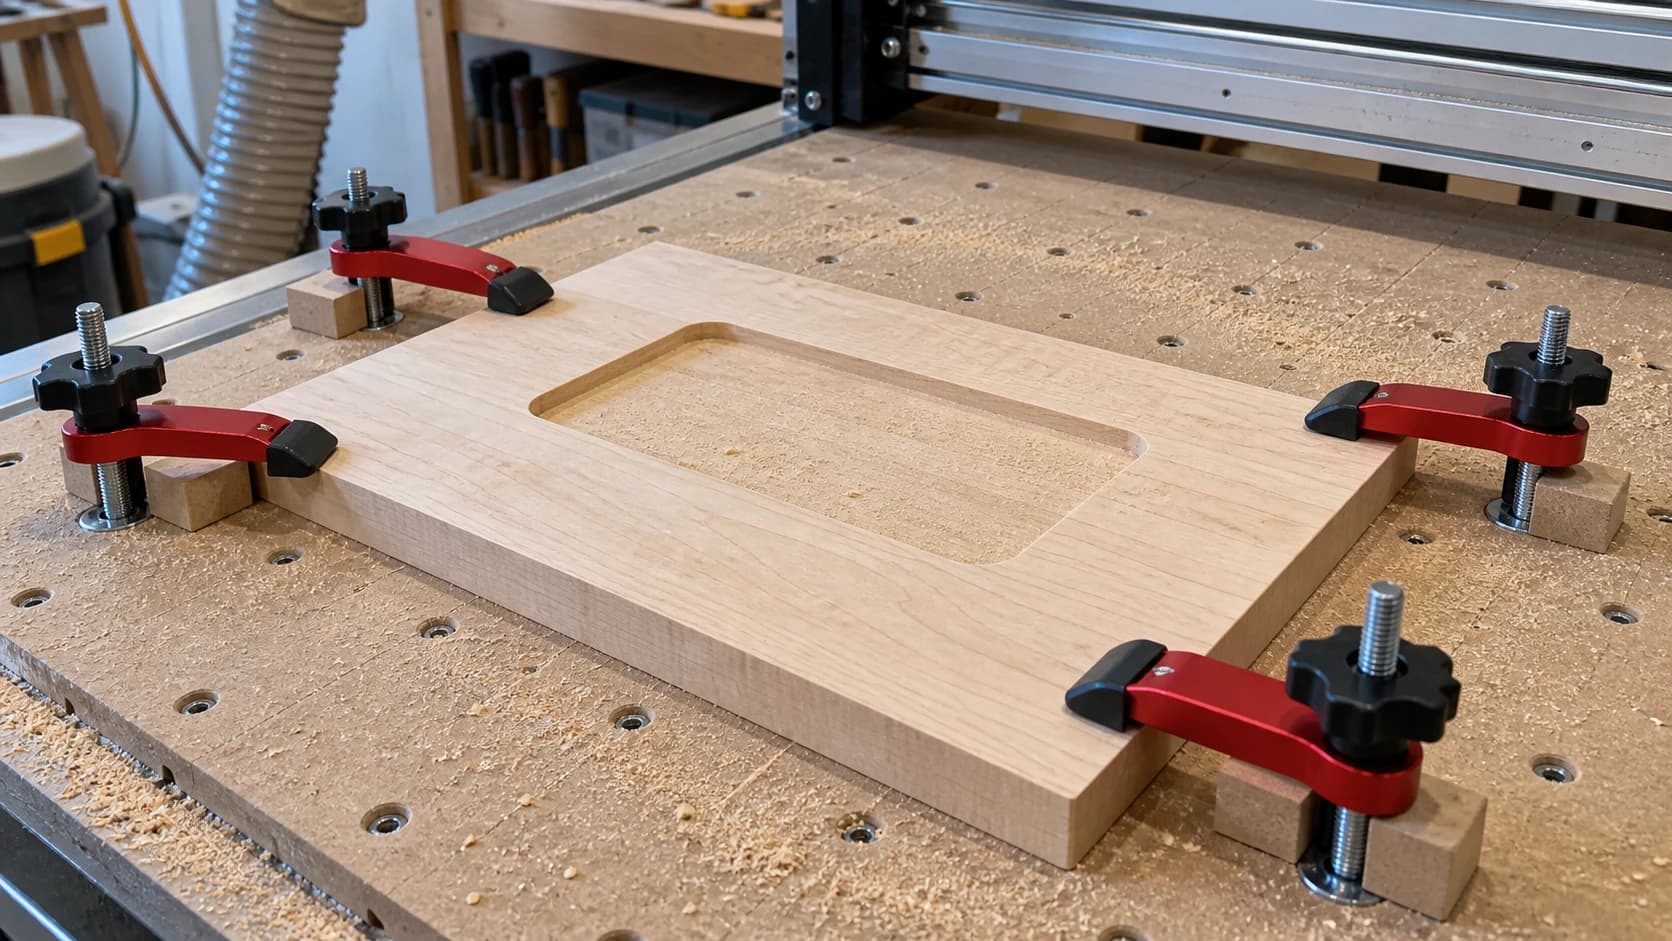
You spent an hour on the design, zeroed everything twice, and hit Start. Twenty minutes in, the machine sounds different for half a second, and now there is a diagonal gouge across your almost-finished sign. The part moved. Nothing was wrong with your file, your bit, or your feeds. The material just was not held down well enough.
Workholding is the least glamorous skill in CNC routing, and it quietly ruins more first projects than feeds and speeds ever will. Everyone obsesses over chip load calculators. Almost nobody talks about the four strips of tape doing the actual load-bearing work. This post covers why parts move, the holding methods worth learning in the order worth learning them, and what each failure looks like so you can diagnose your own scrap pile.
If you are still setting up your first machine, start with our CNC routing beginner's guide and come back. This post assumes you know what a spoilboard is for, even if yours is still pristine.
Why Parts Move: Cutting Forces in Plain English
A spinning router bit does not politely lift material away. It grabs chips and throws them, and every chip it takes pushes back on the workpiece in the opposite direction. Those forces come in three flavors, and each one defeats a different kind of workholding.
Sideways push. As the bit travels through the cut, it shoves the workpiece sideways, away from the direction of travel. This is the force that slides a poorly held board across the spoilboard. It changes direction constantly as the toolpath changes direction, so a part that survived the first ten minutes can still walk on a later pass.
Lift. Upcut spiral bits pull chips up and out of the cut. That geometry is great for clearing chips and terrible for workholding, because it pulls the workpiece up too. If the bit in your spindle is an upcut, assume it is actively trying to lift your part. Thin stock and small parts are the most vulnerable. Tape that resists sliding beautifully can still let a corner peel upward.
Grab and yank. When a bit is dull, buried too deep, or fed into a climb cut it was not ready for, it can stop cutting and start grabbing. Instead of a steady push, the workpiece gets a sudden yank. This is the force behind the scariest failure mode, the thrown part, and it is why "it held fine on the last job" is not a guarantee.
The takeaway: your workholding has to resist sliding in every horizontal direction and lifting straight up, all at once, for the whole job. Every method below is a different answer to that problem.
PRINT. CUT. CARVE.

- Multiple formats (SVG, DXF, PNG)
- Machine-tested designs
- Commercial licenses
Sponsored by PrintCutCarve.com
The Methods, Ranked for Beginners
There is no single best method. There is a best method for each job, and a sensible order to learn them in.
| Method | Cost | Holds sideways | Holds lift | Best for | The catch |
|---|---|---|---|---|---|
| Clamps | Cheap | Good | Good at the clamp | Thick stock, quick jobs | Bit collisions, unheld middles |
| Screws | Nearly free | Great | Great | Sheet goods, production | Holes in your part or waste |
| Tape + CA glue | Cheap | Great | Great | Almost everything | Prep time, surface prep matters |
| Toggle/cam clamps | Moderate | Good | Good | Repeat jobs, fixtures | Setup time, still a collision risk |
| Vacuum table | Expensive | Great | Great | Production sheet work | Overkill for hobby machines |
Clamps: where everyone starts, and the trap everyone falls into
Clamps are the obvious first answer, and they work. Low-profile hold-down clamps bearing on the edges of your stock resist both sliding and lifting, at least near the clamps themselves.
The trap has a sound, and you will only need to hear it once: the bit hitting a clamp at full speed. It is easy to place clamps while looking at the material and forget where the toolpath actually goes. Cutting a profile around the outside of a part? That is exactly where your clamps are sitting.
Three habits keep clamps out of the bit's way:
- Preview the full toolpath in your CAM software with the actual cut boundaries visible, then place clamps outside every line.
- Run an air cut above the material on a new setup. Watching the machine trace the job with the bit raised costs a few minutes and catches clamp collisions for free.
- Use low-profile clamps so that even a mistake in Z is less likely to find them.
Clamps have a second, quieter weakness: they only hold where they are. Clamp the four edges of a wide board and the middle can still flex and chatter, or bow upward as internal stresses release during the cut. For big pockets in the middle of a panel, clamps alone are usually not enough.
Screws: ugly, cheap, and nearly unbeatable
Driving screws through your stock into the spoilboard is the least elegant method on this list and one of the most secure. Well-placed screws resist both sliding and lifting about as firmly as anything a beginner can buy, which is why they remain a common, nearly free option for holding sheet goods.
The obvious cost is holes. You put screws either through the waste areas of your sheet, where they cost you nothing, or through the finished part, where they cost you the part. Plan screw locations in CAM the same way you plan clamps: look at where the parts are, put screws where the parts are not.
Two cautions. First, know what is under your spoilboard. Screws that reach the machine bed or a frame member will find them. Second, mark or map your screw locations so a later toolpath does not route through one. Cutting a screw ruins the bit instantly and can throw sparks into a bed of sawdust.
Painter's tape and CA glue: the workhorse
This is the method that sounds like a hack and behaves like a professional fixture. Cover the spoilboard area with painter's tape, cover the bottom of the workpiece with painter's tape, run beads of CA glue (super glue) on one taped surface, spray activator on the other, and press them together for a few seconds.
The glue bonds tape to tape with remarkable strength, and when the job is done, the tape peels off both surfaces cleanly. No holes, no clamps for the bit to find, nothing sticking up above the material at all, and the hold is continuous across the entire bottom face, so there is no unheld middle to chatter.
That full-face hold is why this method quietly solves problems the others cannot:
- Cutout parts stay put. When a profile pass cuts a part completely free, a clamped or screwed setup leaves that part held by nothing. On tape and glue, the freed part is still stuck down and cannot shift into the bit.
- No collision planning. There is nothing above the surface to hit.
- Thin stock stays flat. The continuous bond fights lift everywhere, not just at the edges.
It is not magic. The things that make it fail are all preparation:
- Dusty or oily surfaces. Tape sticks poorly to a dusty spoilboard or a waxy board. Wipe both surfaces first.
- Sparse coverage. A couple of tape strips and one dot of glue will not hold a full-sheet job. Coverage should scale with the size and aggression of the cut.
- Cupped stock. Tape cannot pull a badly bowed board flat. If the middle of the board is not touching the tape, it is not held there. Flatten the stock, or hold the bow down with a clamp while the glue sets, then remove it before cutting if the path requires.
Tip
Put the glue on one surface and the activator on the other, not both on the same side. The bond grabs in seconds when the surfaces meet, which is exactly what you want, so dry-fit your placement first. You get one try.
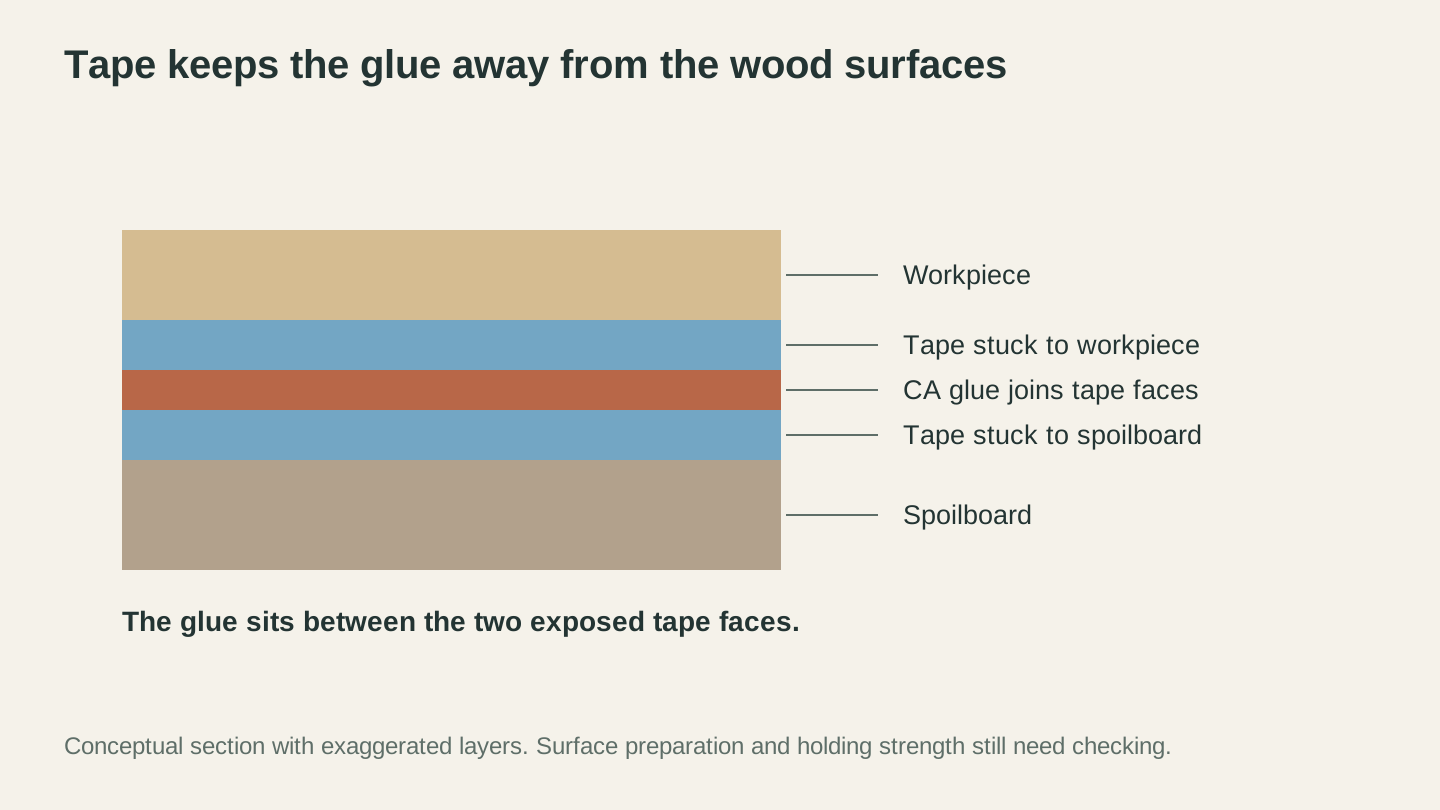
Each tape layer sticks to its wood surface; CA glue joins the two exposed tape faces. The section shows the layer order, not a holding-strength rating.
Toggle and cam clamps: for the job you run twenty times
Once you cut the same part more than a few times, screwing toggle clamps or cam clamps to a fixture board starts paying for itself. Drop the blank in, flip the levers, cut, flip, swap. Registration pins or a routed pocket in the fixture put every blank in exactly the same place, so you stop re-zeroing X and Y for every part.
For a first machine and one-off projects, this is a method to know about rather than a method to buy. The moment you find yourself cutting batch two of something you sell, come back to it. The same collision rule applies: toggle clamps stand tall, so keep them well outside the toolpath and air-cut the first run.
Vacuum tables: honest talk
A vacuum table holds the entire sheet down with suction through the bed. It is the gold standard for production sheet cutting: instant hold, zero clamps, full-face grip.
For a hobby machine, it is almost always overkill. A real vacuum setup means a serious pump, plumbing, gasketing, and a bed built for it, and small parts with small footprints are exactly where vacuum grip is weakest. The tape and glue method gives a hobbyist most of the same benefits, full-face hold with nothing above the surface, for the price of a roll of tape. If you ever scale to cutting full sheets daily, you will know, and you will not need a blog post to tell you.
Spoilboard Basics: the Foundation Under Everything
Every method above assumes one thing: a flat, trustworthy surface to hold against. That is the spoilboard's job. It is a sacrificial sheet, usually MDF, that lives between your machine bed and your work, there to be cut into so the machine bed never is.
Two habits matter:
Surface it. A fresh spoilboard is not flat relative to your machine until the machine itself has skimmed it. Run a large surfacing bit over the whole board in a light pass, and the surface that remains is, by definition, parallel to the gantry's travel. Do this when the board is new and again whenever the surface gets chewed up enough that tape has more scars than smooth MDF to stick to. A surfaced spoilboard is also what makes consistent cut-through depth possible: if the board varies in height, your "cut 0.2 mm into the spoilboard" profile pass will cut through in some places and leave skin in others.
Let it be sacrificial. Beginners try to protect the spoilboard, hovering profile passes exactly at material thickness. Aim slightly past instead. Scoring shallow lines into the spoilboard is what it is for, and it is far cheaper than the fuzzy, half-attached bottom edges you get from stopping short.
Info
MDF spoilboards drink moisture and swell unevenly with the seasons. If your parts stopped cutting through cleanly and nothing else changed, the board may have moved. Resurfacing takes minutes and rules it out.
Thin and Small Stock: Where Everything Gets Harder
The smaller and thinner the workpiece, the worse every holding problem gets. Thin stock flexes and lifts between hold points. Small parts have almost no surface area to grip, and an upcut spiral treats them like a bottle cap to be flicked across the room.
The playbook:
- Tape and glue is the default. Full-face hold is exactly what flexible material needs, and it works on parts far too small to clamp.
- Consider a downcut bit. Downcut spirals push chips (and the workpiece) down instead of pulling up. Chip clearing suffers in deep cuts, but on thin stock the cuts are shallow anyway, and the downward force works with your workholding instead of against it.
- Lighter passes. Less force per pass means less to resist. Thin material does not reward aggression. Our feeds and speeds guide covers how depth of cut and chip load trade off against each other.
- Cut small parts from bigger stock. Do not try to hold a coaster-sized blank. Hold a board, cut the coaster out of it, and let tabs or tape keep the part captive.
Tabs: Keeping Cutouts Captive
The final pass of a profile cut is a trap built into the job itself. For the whole cut, the part is attached to the surrounding stock. On the last pass, that attachment disappears, and if nothing else is holding the part, it is now loose next to a spinning bit.
Tabs solve this in CAM. They are small bridges of uncut material, placed around the profile, that keep the part connected to the parent stock until you cut or snap them free after the job. A few placement rules:
- Three or more, spread around the profile. One tab makes a pivot, not a hold.
- Put them on straight sections, not curves or corners, because you will clean them up with a flush trim or sanding block afterward and straight sections are the easiest to blend.
- Size them to the material. Dense hardwood holds with smaller tabs than soft pine or foam. If a tab snaps from the vibration of the cut itself, it was too small.
If you are using tape and CA glue with good coverage, you can often skip tabs entirely, since the freed part stays glued down. Belt and suspenders on an expensive workpiece is also a perfectly reasonable choice: tape underneath, tabs in the toolpath.
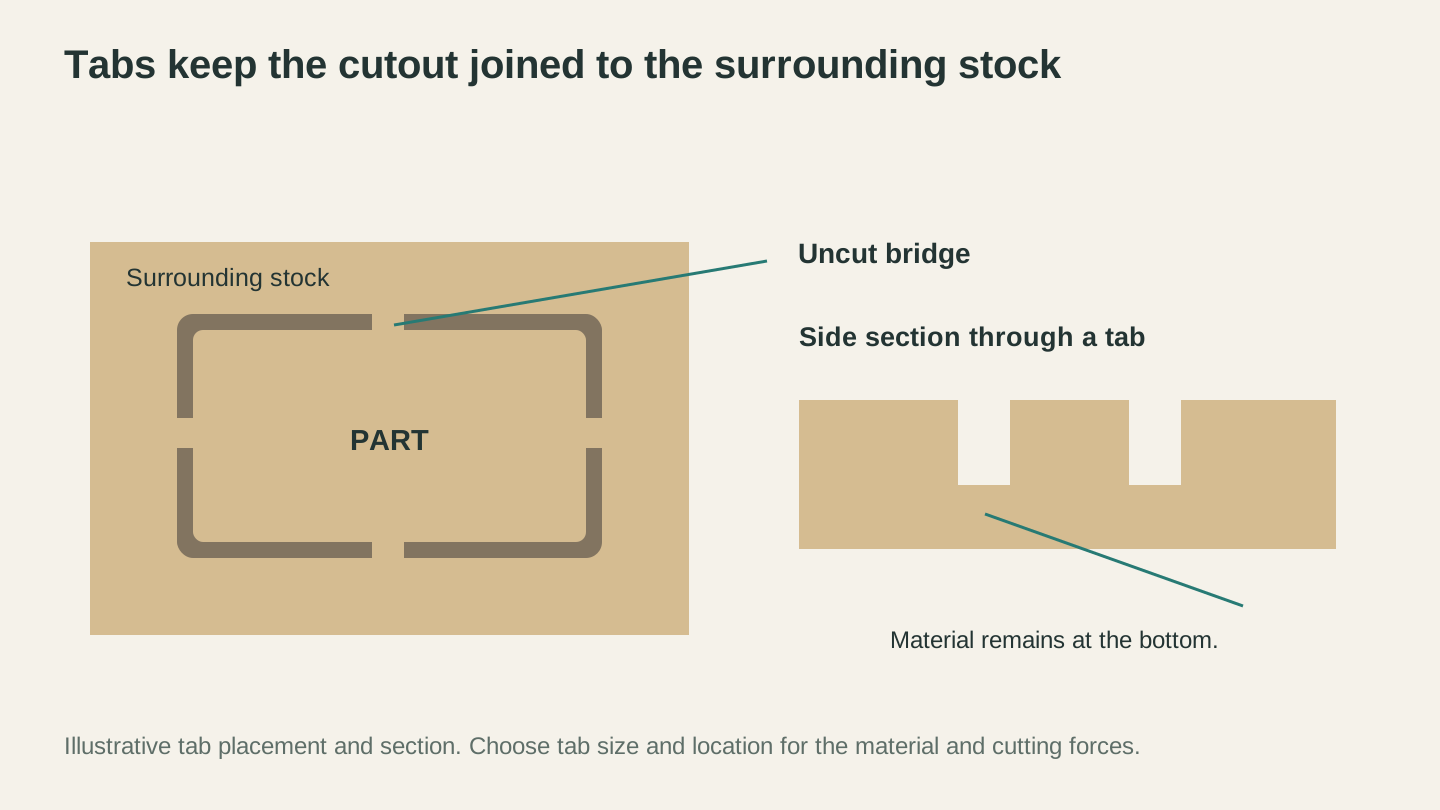
Tabs leave material connecting the part to the parent sheet. The side section shows how a reduced-height bridge can remain beneath the cut.
The Failure Gallery: Reading Your Scrap
Every workholding mistake leaves a distinctive fingerprint. Learning to read them turns a ruined part into a diagnosis.
The shifted part. The cut is clean and correct up to one moment, then everything after it is offset in the same direction by the same amount. Often there is a single deep gouge at the transition. This is a sideways slide: the whole workpiece moved and stayed in its new position. Suspect too little tape coverage, a dusty spoilboard, or clamps that were snug rather than tight.
The lifted corner. Cut depth gets mysteriously shallow toward one corner or edge, or the bottom of the part shows uncut skin in one region while cutting through elsewhere. The workpiece peeled upward there, riding above where the toolpath expected it. Upcut bit plus thin stock plus edge-only holding is the classic recipe. More coverage under the middle, a downcut bit, or lighter passes.
The chattered middle. Edges are clean but a pocket in the center of the panel shows ripply, hairy walls and a rough floor. The middle of the board was flexing under the bit even though the part never actually moved. This is the unheld-middle problem: clamps at the edges, nothing underneath the action.
The wandering cutout. The main sheet is fine, but a cut-free part has a bite taken out of its edge, or got dragged and scarred. It came loose on the final pass and met the bit. Tabs were missing, too small, or the tape under that specific part was sparse.
The thrown part. The workpiece, or a piece of it, left the machine entirely. Treat this one as the safety event it is, not just a scrap event. A router bit at cutting speed can throw material hard enough to injure. Never lean over a running cut, keep bystanders and kids away from the machine while it runs, wear safety glasses in the shop, and if your machine has an enclosure, use it. Then find the root cause before the next job: a thrown part almost always means grab-and-yank forces exceeded a marginal hold, so check bit sharpness, cut depth, and whether the workholding actually matched the aggression of the cut.
Warning
A part that comes loose does not just ruin the workpiece. A loose part against a spinning bit can shatter the bit, and both become projectiles. If workholding ever feels like a coin flip, stop and fix it before pressing Start. This failure mode, along with the other classics, is covered in our CNC routing mistakes roundup.
Building the Habit
Good workholding is a two-minute checklist, not a talent:
- What directions will the bit push this material? (Preview the toolpath.)
- What resists the sideways push? What resists lift, everywhere, not just at the edges?
- What happens on the pass where parts cut free?
- Is anything above the surface inside the toolpath? (Air cut if unsure.)
Run that on every job and the diagonal-gouge story from the top of this post stops being yours.
And when a specific setup has you scratching your head, a weirdly shaped blank, a warped board you cannot flatten, a part with no waste area for screws, describe it to Craft Chat. It is free with a signed-in account, it knows CNC workholding, and "how would you hold this part" is exactly the kind of question it is good at. Bring your strangest blank.
Ready to try these tools?
Sign up free, no credit card required. Free tools available immediately.
Start Free