

Beginner Jewelry Making Ideas (No Fancy Tools Needed)
Search for jewelry making and within about four minutes you'll be looking at a torch, a rolling mill, a flex shaft, and a bench pin, and quietly deciding to do this later. Maybe next year. Maybe when there's room in the garage.
Skip all that. The barrier to making jewelry people actually want to wear is three pliers and about twenty dollars of findings. Silversmithing is a wonderful craft and it is not where anyone should start. Start with the stuff that comes out looking good on your first evening, and let the equipment follow the interest instead of leading it.
Here's what to buy, the four skills that carry everything, and a pile of projects worth your first weekend.
What You Actually Need
You need less than you think, and the cheap tools genuinely are fine at this stage. What matters is that they exist, not that they're nice.
| Item | Why it matters | Skip it for now? |
|---|---|---|
| Round nose pliers | Forms every loop in every project | No. This is the one tool you cannot fake |
| Chain nose pliers | Grips, closes jump rings, tucks wire ends | No |
| Flush cutters | Cuts wire with a flat end instead of a spike | No |
| A second chain nose or flat nose plier | Jump rings need two hands' worth of grip | Buy it second, not first |
| Findings assortment | Jump rings, head pins, ear wires, clasps | No. This is the whole hobby |
| Beading elastic or cord | Bracelets with zero metalwork | Only if you skip bracelets |
| Bench block and small hammer | Flattening and texturing wire | Yes, add later |
| Torch, mill, flex shaft | Real metalsmithing | Yes. Much later, if ever |
Two notes that save money. First, a cheap "jewelry making kit" with a huge findings assortment is usually better value than buying each finding separately while you figure out what you like. Second, buy plated findings for practice and better metal for anything you'll wear or sell. There's no reason to learn wrapped loops on sterling.
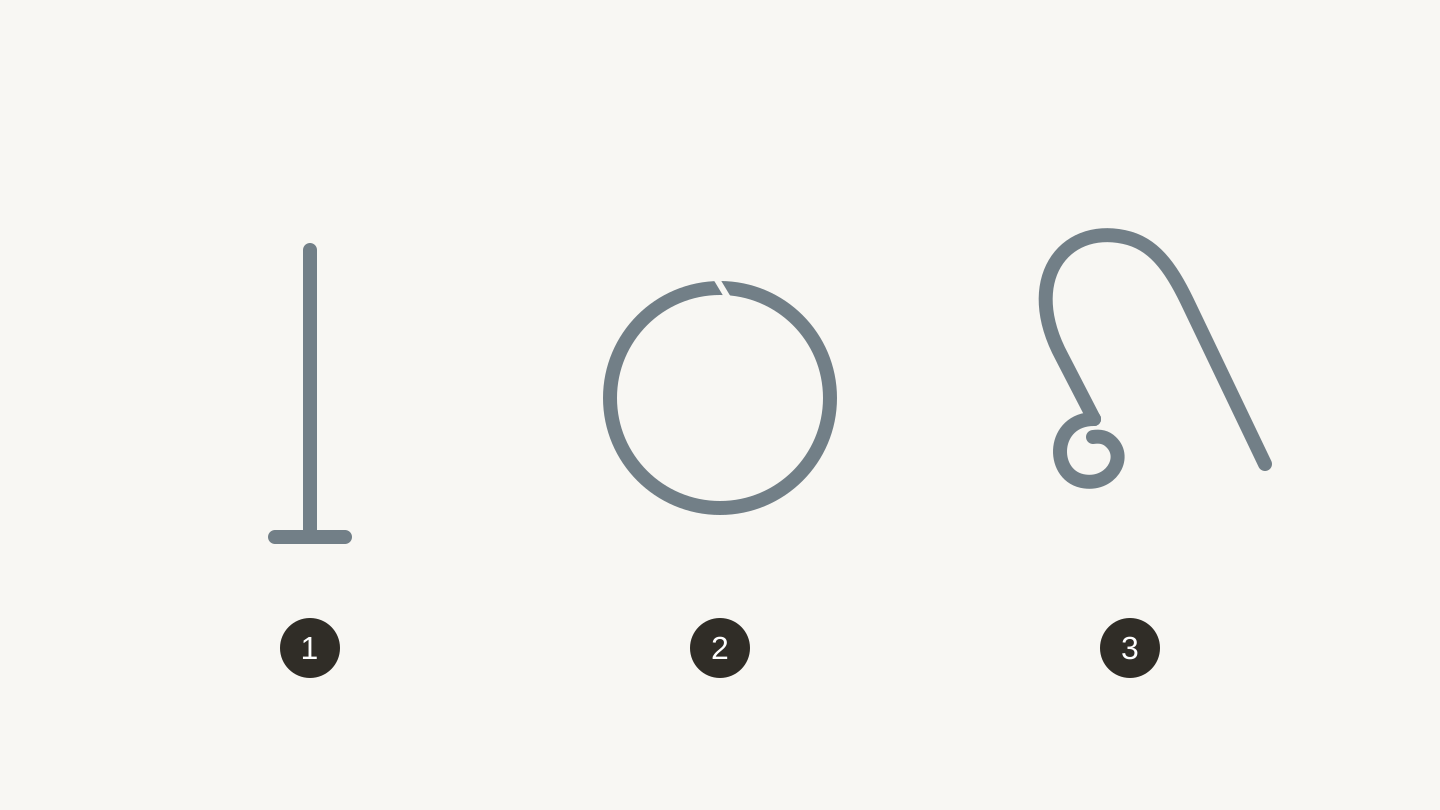
Three common findings: 1, a head pin holds a bead; 2, a jump ring connects components; 3, an ear wire carries the finished dangle. Shapes are simplified and are not shown to scale.
PRINT. CUT. CARVE.
- Multiple formats (SVG, DXF, PNG)
- Machine-tested designs
- Commercial licenses
Sponsored by PrintCutCarve.com
The Four Skills Everything Is Built From
Almost every beginner project is a recombination of these four moves. Get them clean and your work stops looking homemade in the bad way.
1. The simple loop
Trim your wire or head pin to roughly a centimeter above the bead, bend it over to about ninety degrees, grip the very tip with round nose pliers, and roll the wire toward you into a circle that sits centered over the bead. Exact lengths vary by wire gauge, so practice on a scrap first. That's an earring dangle, a charm, a chain link, and half of everything else.
The mark of a beginner loop is that it's off-center and slightly open. Grip the same spot on your pliers every time so your loops come out the same size, and close the gap fully at the end.
2. The wrapped loop
Same idea, but before closing you wrap the tail two or three times around the neck of the loop and snip the excess. It takes ten extra seconds and it cannot pull open. Use it for anything holding weight, anything with a stone you'd be sad to lose, and anything you sell.
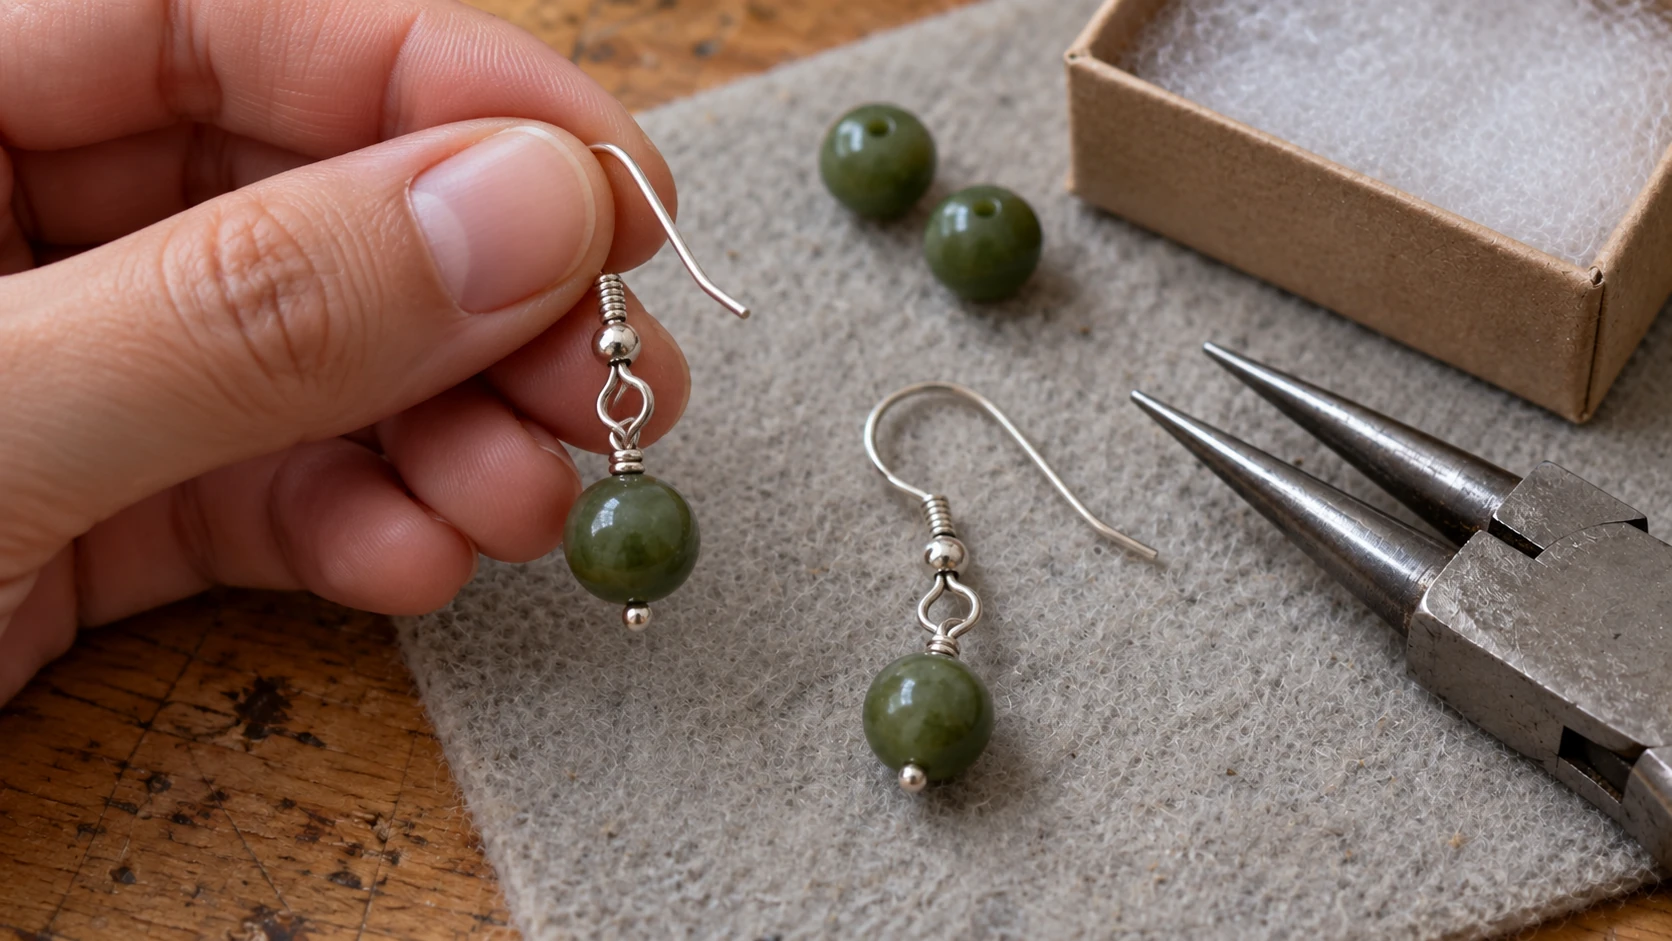
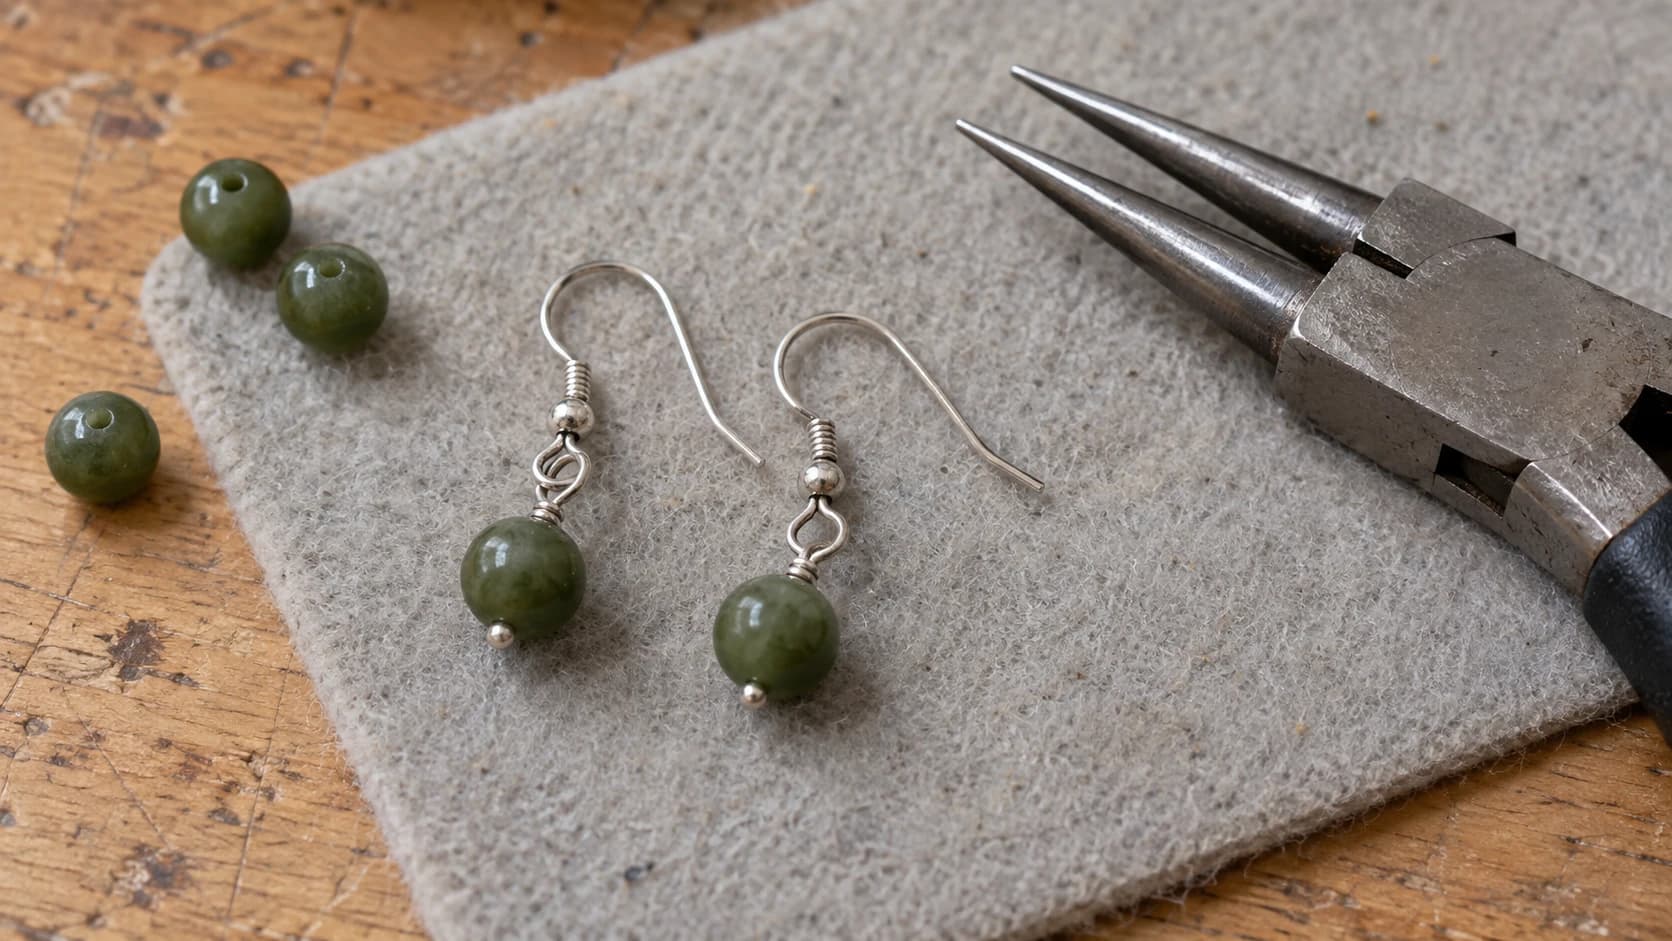
The wrapped loop sits above the bead and links to the ear wire. Consistent loop size and neatly tucked wire ends help a simple pair look finished.
3. Opening a jump ring correctly
This is the one nobody tells beginners and everybody does wrong. Do not pull a jump ring open like a letter C. That deforms it and it will never close flush again.
Grip each side of the split with pliers and twist one side toward you and the other away, so the ring opens sideways. Reverse the twist to close. You should feel a tiny click as the ends meet.
Tip
Wiggle the two ends past each other slightly before you settle them back together. The spring in the metal holds the seam tight and the ring stops catching on clothing.
4. Knots that hold
For cord and elastic work, the knot is the failure point. Use a surgeon's knot, which is an overhand knot with an extra pass through, pull it tight, add a dot of jewelry glue, and hide the knot inside a bead. Elastic bracelets that snap early have often failed at a single overhand knot with no glue, though overstretching and too-thin cord will do it too.
That's it. Four skills. Everything below is those four moves in different arrangements.
Threaded and Beaded Projects
The fastest wins, and the ones that need the least metalwork.
Stretch bracelets. Beads on beading elastic, surgeon's knot, glue, knot hidden in a large-hole bead. The trick to a good one is stretching the elastic gently before you string, so it doesn't relax later and go baggy. Also do not string it so tight there's no give, which is the other way these fail.
One bead, one cord. A single interesting bead or a drilled stone on a leather or waxed cotton cord with an adjustable sliding knot. This is minimal in the way people actually pay for, and it takes about ten minutes. The sliding knot is worth learning on its own because it turns every cord piece into a one-size-fits-all piece.
Memory wire bracelets and rings. Memory wire holds its coil shape, so you string beads and turn a small loop on each end. No clasp, no sizing, no fastening skill required. Use dedicated memory wire cutters or heavy cutters, since memory wire will chew up fine flush cutters.
Knotted cord and macramé. Square knots and spiral knots with waxed cord, a few beads worked in, finished with a sliding closure. Zero metal, zero tools beyond scissors, and endlessly variable by color.
Charm necklaces. Buy a plain chain, add charms with jump rings at intervals. It's the simplest possible project and it teaches jump ring control, which you'll use forever.
Wire Projects
Wire is where the hobby gets addictive, because raw wire plus pliers becomes an actual object with no other input.
Wire-wrapped stones and sea glass. The classic. Take an undrilled stone, beach pebble, or piece of sea glass and cage it in wire with a loop at the top for a chain. Start with 20 or 22 gauge craft wire in copper for practice, because you will do this badly several times and copper wire is cheap.
Flatter stones with a slight taper are far easier than perfect spheres. Round objects want to escape the wrap, so your first attempt should be a flat oval, not a marble.
Wire rings. A few wraps around a ring mandrel or a dowel of the right diameter, with a decorative coil or a bead on top. Fast, sized to the wearer, and a good way to burn through practice wire productively.
Simple hoops and hammered shapes. Bend wire around a cylinder, form a loop, and if you have a block and hammer, flatten sections to catch the light. Hammering work-hardens the wire, which is a genuine bonus: the shape holds better after it's been struck.
Wire word or shape pendants. Bend a name, a heart, an infinity, or a small animal outline in one continuous piece of wire. Sketch the shape on paper first at actual size and bend over the drawing.
Info
Wire gauge counts backwards. A higher number is thinner wire. For beginners, 20 or 22 gauge is the sweet spot for wrapping, 18 gauge is good for shapes that need to hold themselves up, and 26 to 28 gauge is for fine decorative binding wraps.
Polymer Clay Projects
Polymer clay is possibly the highest ratio of results to equipment in the whole craft. It cures in a home oven, it comes in every color, and a block costs about the same as a coffee.
Statement earrings. Roll a sheet, cut shapes with small cutters or a craft blade, punch a hole near the top before baking, bake, then attach jump rings and ear wires. Because clay is so light, you can make earrings far larger than you could in metal and still wear them comfortably all day.
Marbled and terrazzo effects. Twist two or three colors together partially for marble, or bake scraps, chop them, and press the chips into a fresh base sheet for terrazzo. Both look far more complicated than they are.
Faux stone. Layer translucent clay with tiny amounts of color and a little alcohol ink to fake agate, turquoise, or marble. This is where people start losing whole evenings.
Pendants and beads. Same technique, bigger canvas. Pierce bead holes before baking with a needle tool, and remember the hole shrinks slightly less than you expect, so err large.
Warning
Polymer clay needs its own dedicated gear. Never reuse clay tools, blades, rolling surfaces, or baking trays for food, and don't use your good kitchen equipment. Bake at the temperature printed on the package and no higher, use an oven thermometer since ovens run hot, and ventilate the room. Burning polymer clay releases irritating fumes, so if it starts to darken or smell sharp, turn the oven off and open a window.
Resin and Found Objects
Resin jewelry deserves its own mention because the entry cost is low and the results photograph beautifully. Small silicone molds, a two-part resin, and pressed flowers or glitter or tiny keepsakes will give you pendants and earrings that look nothing like beginner work.
The catch is that resin has real technique and real safety requirements: gloves, ventilation, correct ratios, and patience through the full cure. Small jewelry pieces are actually the friendliest way in, since shallow pours avoid the overheating problems that plague big castings. If you're heading down this road, read our guide to common resin mistakes and how to fix them first. It'll save you the first three ruined batches.
Found objects deserve a mention too. Vintage buttons become brooches and earrings with a glue-on bail or a pin back. Broken china becomes pendants. Old keys, watch parts, and single earrings whose partner vanished all become something else. Plenty of well-loved handmade jewelry is assembly and curation rather than fabrication, and there is no shame in that whatsoever.
Assembly-Only Projects (Zero Fabrication)
Worth calling out separately, because a lot of people assume "handmade" means making every component from raw material. It doesn't, and some of the most wearable pieces are pure assembly.
- Layered chain necklaces in mixed lengths and mixed metals
- Charm bracelets built on a plain chain, one jump ring at a time
- Beaded ear threads and huggies using pre-made components
- Simple pendant plus chain pairings, chosen well
- Earring conversions, swapping cheap ear wires on nice earrings for hypoallergenic ones
The skill here is taste, not technique. Color, proportion, and length choices are what make an assembled piece look intentional instead of thrown together. Buy a few pieces you admire, look closely at what lengths and spacings they use, and copy the proportions before you improvise.
The Metal Allergy Thing
This is the one technical detail worth caring about early, because it decides whether people can wear what you make.
Nickel allergy is common, and cheap plated ear wires are a frequent trigger. Someone who reacts to an earring will not wear it again and will not buy another one. Getting this right early costs very little.
| Ear wire material | Notes |
|---|---|
| Surgical stainless steel | Inexpensive and a common default, though the term covers several alloys, so buy from a supplier that states the grade |
| Titanium | Well tolerated and a good choice for sensitive ears, costs more |
| Niobium | Generally well tolerated, comes in anodized colors, specialty purchase |
| Sterling silver | Usually fine, but some people still react to alloy content |
| Unlabeled plated base metal | Where most reactions come from. Fine for practice pieces, not for gifts or sales |
The practical approach: use whatever you like for the decorative parts, and spend the extra on the part that touches skin all day. Ear wires and posts are cheap components in the scheme of a piece.
Where Craft Chat Actually Helps
Most of the friction in early jewelry making is not skill, it's not knowing the name of the thing you need. You've seen a finding in a photo, you don't know what it's called, so you can't search for it, so you're stuck.
Craft Chat is the AI assistant built into Craftgineer, and it's genuinely useful for exactly this kind of gap. It's free with a signed-in account and runs on monthly chatbot messages rather than credits. Questions it handles well:
"What is this called?" Upload a photo of a component and describe what it does. Bail, crimp cover, end cap, cord end, ear nut, split ring, clamshell knot cover. Once you have the word, the shopping part becomes trivial.
"What can I substitute?" You're mid-project at 9 PM and out of 6mm jump rings. Ask what will work instead and what the trade-off is. This is where an instant answer beats waiting on a forum reply.
"Why does this keep failing?" Elastic bracelets snapping, wrapped loops that come out lumpy, jump rings that won't sit flush. Describe your materials and what you did, add a photo, and get a diagnosis rather than a list of generic tips.
"What do I buy first for X?" Give it a specific project and a budget and ask for the shortest possible shopping list. Beginner tool lists online are almost always padded with things you won't touch for a year.
"Plan me a progression." Ask for a sequence of five projects that each add one new skill, starting from where you are. Structured practice beats random project hopping by a mile.
The same rule applies here as anywhere: specific questions get specific answers. "How do I make earrings" gets a paragraph you already knew. "My wrapped loops keep coming out with a visible gap between the wrap and the loop, I'm using 22 gauge copper wire and round nose pliers, here's a photo" gets an actual fix. Our guide on using AI chat to learn maker skills goes deeper on getting good answers out of it.
If You Want to Sell Any of It
Handmade jewelry can sell well, and materials are often cheap relative to what people will pay for something that looks considered. That's also the trap: cheap materials make it tempting to underprice, and underpricing handmade work is how people burn out.
Two things to sort out before your first market or shop listing. Price properly, including your time and not just your bead cost, which our guide to pricing handmade products walks through. And if you're heading to an in-person market, jewelry has particular display demands, since pieces laid flat on a table are easy to walk past. Varying your display height helps more shoppers actually see them. Our craft fair selling guide covers booth setup.
One jewelry-specific tip: make a small number of designs in a lot of colorways rather than a lot of one-off designs. It is faster to make, and it gives customers a simple choice instead of an overwhelming one.
Pick One and Start Tonight
If you want a single recommendation: buy round nose pliers, chain nose pliers, flush cutters, a mixed findings pack, a spool of 22 gauge copper wire, and a pack of stainless ear wires. That's your whole setup. Make ten pairs of simple bead earrings and throw away the first four.
By pair five your loops will be centered. By pair eight they'll be the same size as each other. That's the entire learning curve for the foundational skill, and it happens in one evening.
Then work outward. Wire wrap a pebble from your yard. Roll out a block of clay. Try a resin pendant. The tools you'll eventually want will make themselves obvious through the projects that keep frustrating you, which is a much better way to build a bench than buying a kit that promises everything.
And when you hit the thing you can't name or can't fix, take a photo and ask Craft Chat. Getting unstuck quickly is the difference between a hobby that sticks and a box of pliers in a cupboard.
Ready to try these tools?
Sign up free, no credit card required. Free tools available immediately.
Start Free